Showing posts with label quilty. Show all posts

Wednesday, June 15, 2011

Here a Bag. There a Bag.

A few weeks ago I made these bags by request.  I became addicted to them.  They are large flat bags with batting and lining.  The top is folded over so the lining shows for the accent.  Both fabrics are used on the handles and there is a little pocket inside.  It was fun to match the fabrics and then to find different ways to quilt each one.  A few have wavy lines, one is meandering. One has veins quilted on the leaves.  The black and white one has white buttons; the smokey one has glass beads and glittery floss flowers. The reddish one has white french knots. 
There were scraps leftover so they became tissue holders and zipper bags.  What else could I do?!
The bags have gone to their new homes but, in between making quilts, I keep making bags.  I can't help it.
I have two more finished and a few more in progress.
Yep, I'm a bag lady.

Friday, January 7, 2011

Inchie Wallhanging

.... or "Bulletin Board Art".

Three inch sized quilts on a fabric tube with a key ring for a hanger.


Love


Heals

All


And three beads at the bottom on another key ring...

These inchies are addictive!

Tuesday, November 2, 2010

Quilting Again

Anita made this quilt.  And I had the pleasure of quilting it.  It looks so fresh and clean to me.  The fabrics look like a Spring or Summer or Winter depending on your mood.  The only season I don't see is Fall.  Lovely quilt Anita!

The backing is white and I was tempted to use white thread (and really scared to use anything else) but it really seemed to call for light green.  So every blip shows on the back.  But I think green was the right choice.  It blends beautifully and looks great in the white areas.
Sorry about the picture quality. So much harder when you can't photograph outside, but it's been much too windy.  I didn't want the quilt to wind up in the next county!

Friday, August 13, 2010

Vintage Linen Lunch Bag Tutorial

You won't mind "brown bagging it" with this fresh looking lunch bag that can be used over and over.  And it's easy to make!

Step 1: Gather your materials
1 piece of vintage linen cut 11" x 20"  (bag exterior)
2 pieces of vintage linen cut 3" x 12" (bag handles)
1 piece of solid coordinating fabric cut 11" x 20" (lining)
2 pieces of solid coordinating fabric cut 5" x 5" (flower)
Thread
Ric Rac

Step 2: Construct handles
Press both 3"x12" pieces in half lengthwise.
Open.
Fold long edge in to pressed line on each side.
Press each of these new edges, but don't press over the first pressed line. 
Fold in half again lengthwise.
Top stitch close to each edge.
Set aside.

Step 3: Construct bag exterior

Fold 11"x 20" piece of vintage linen in half, right sides together.
Sew along both sides.
Draw a 1" square at each corner of the bottom of this piece.
Cut out square.
Manipulate one of the bottom corners that you cut so that sewn seam touches the start of the bottom fold - you should have raw edges of fabric on each side of this point - sew together to form one side of a square bottom.


 Repeat with the other cut corner.

Step 4. Construct liner


Same way you constructed the exterior...


Step 5: Put it all together


Turn liner bag right side out. 
Place liner bag inside exterior of bag (which is inside out... so right sides are together). 
Place handles between these two pieces with the raw edges of the handle just barely sticking out. The ends of the handle should be about 3" apart.  Pin in place.  Do this with each handle.  (You may find it easier to place the handles if you pin them just to the exterior first, then insert the liner and repin.)
Stitch almost all the way around, leaving about 2 - 3" unsewn.
Use opening left to turn bag right side out.
Topstitch all the way around the top of the bag including the opening you left.

Step 6: Embellishing
Topstitch ric-rac just below the edge of the top.
Make flower by tracing a circle (I use a small coffee container) and sewing the two 5" squares together on the circle.  In the center of just one of the circles cut a small opening. 

Pull circle through this opening so the seam is inside.  Hand stitch - with large stitches - a circle in the center of the flower; leave long thread hanging.  Stuff the center of this little circle with bits of batting. Pull on thread to gather circle and this will ruffle the outside edges of the large circle and will form the flower.  Hand stitch to the bag around the edge of the little circle.

Load and go!

This is my first tutorial...
any suggestions, questions, and comments are welcome!


Tuesday, August 3, 2010

ConKerr Cancer & Project Linus

These two pillowcases are for ConKerr Cancer.
And this quilt is for Project Linus.

I was motivated by LoveBug Studios giveaway contest

It's an awesome giveaway.... make items to give to one or all of three charities and earn points.  The highest point earner wins a GO!   I don't have a snowball's chance in h... um ... er ... August, but the charities win no matter what.  I've been wanting to make pillowcases for ConKerr Cancer, and it's been a while since I gave a quilt to Project Linus, so I'm glad for the gentle push.

Wednesday, July 28, 2010

Not So Fast ...And One Flower

I was sewing away fast and furiously on a kid sized quilt made of one giant block. 
It was going together fast.
Perhaps a little too fast.  
As mom would say "more haste, less speed".
Time for the seam ripper.

Just one flower this week.  But isn't it a pretty one?!
Thanks for the fabrics Karen.

Today Is . . .

The rules for the latest challenge in Project QUILTING read as follows:

Visit an office supply store.  Choose three items for inspiration.  You may use the actual items in your project but you do not have to use them.  Circumference should not be more than 130".

My inspiration items included a small box of crayons, colorful envelopes and colorful paper.

The end result was a perpetual calendar quilt titled "Today Is..."


I started with a piece of white fabric which I sandwiched with batting and backing.  For the slightest hint of color I used yellow thread and quilted a loopy meandering, adding in a few stars, flowers, suns, and musical notes.  I doodled.

Next, the envelopes.  Using eight fabrics of basic colors found in a small box of crayons (plus pink) I made two sided rectangles, making the top pointed, and folding up the bottom to create the envelope.  These were then laid out on the quilted piece and sewn down.   The dates (like little pieces of stationery) are also two sided.  I used my new serger for these.  (DH knows me and knows I'd much prefer a sewing item to jewelry - he bought me a serger for our anniversary!!!)  I like the border the white thread makes on these.  Numbers for dates cut from black fabric were fused to the 'stationery'.  The dates are folded in half and tucked in the appropriate envelope. 
The black cirle has the center cut out but it's still attached at the top so it can also be tucked in the envelope, leaving the rest of the circle to 'circle the date'.


The months are appliqued letters in appropriate colors. The month banner is held on with binder clips. To dress up the clips I added floss strung with beads the same colors as the fabrics.

Then I added a row of beads to the bottom of the quilt.


For those pesky months (every year has a few) that procrastinate until the end of the week and don't start until Saturday or Sunday, forcing us to add another row of days, I included binder clips that hang from the beads and hold the extra day or two. 
Another fun challenge.  Another learning experience.  I find that with the deadline I am forced to solve my problems as they come up instead of setting it all aside to become another UFO.  There were ten other entries.  As with all the other weeks, I'm impressed by all the finished projects and amazed at the creative interpretations.   You can see all the projects at Flickr: Project Quilting Pool.  You can also see them (but only one pic of each) AND you can vote for your favorite at Kim's Crafty Apple

Friday, July 23, 2010

45 Kindred Spirits = 1 Quilt


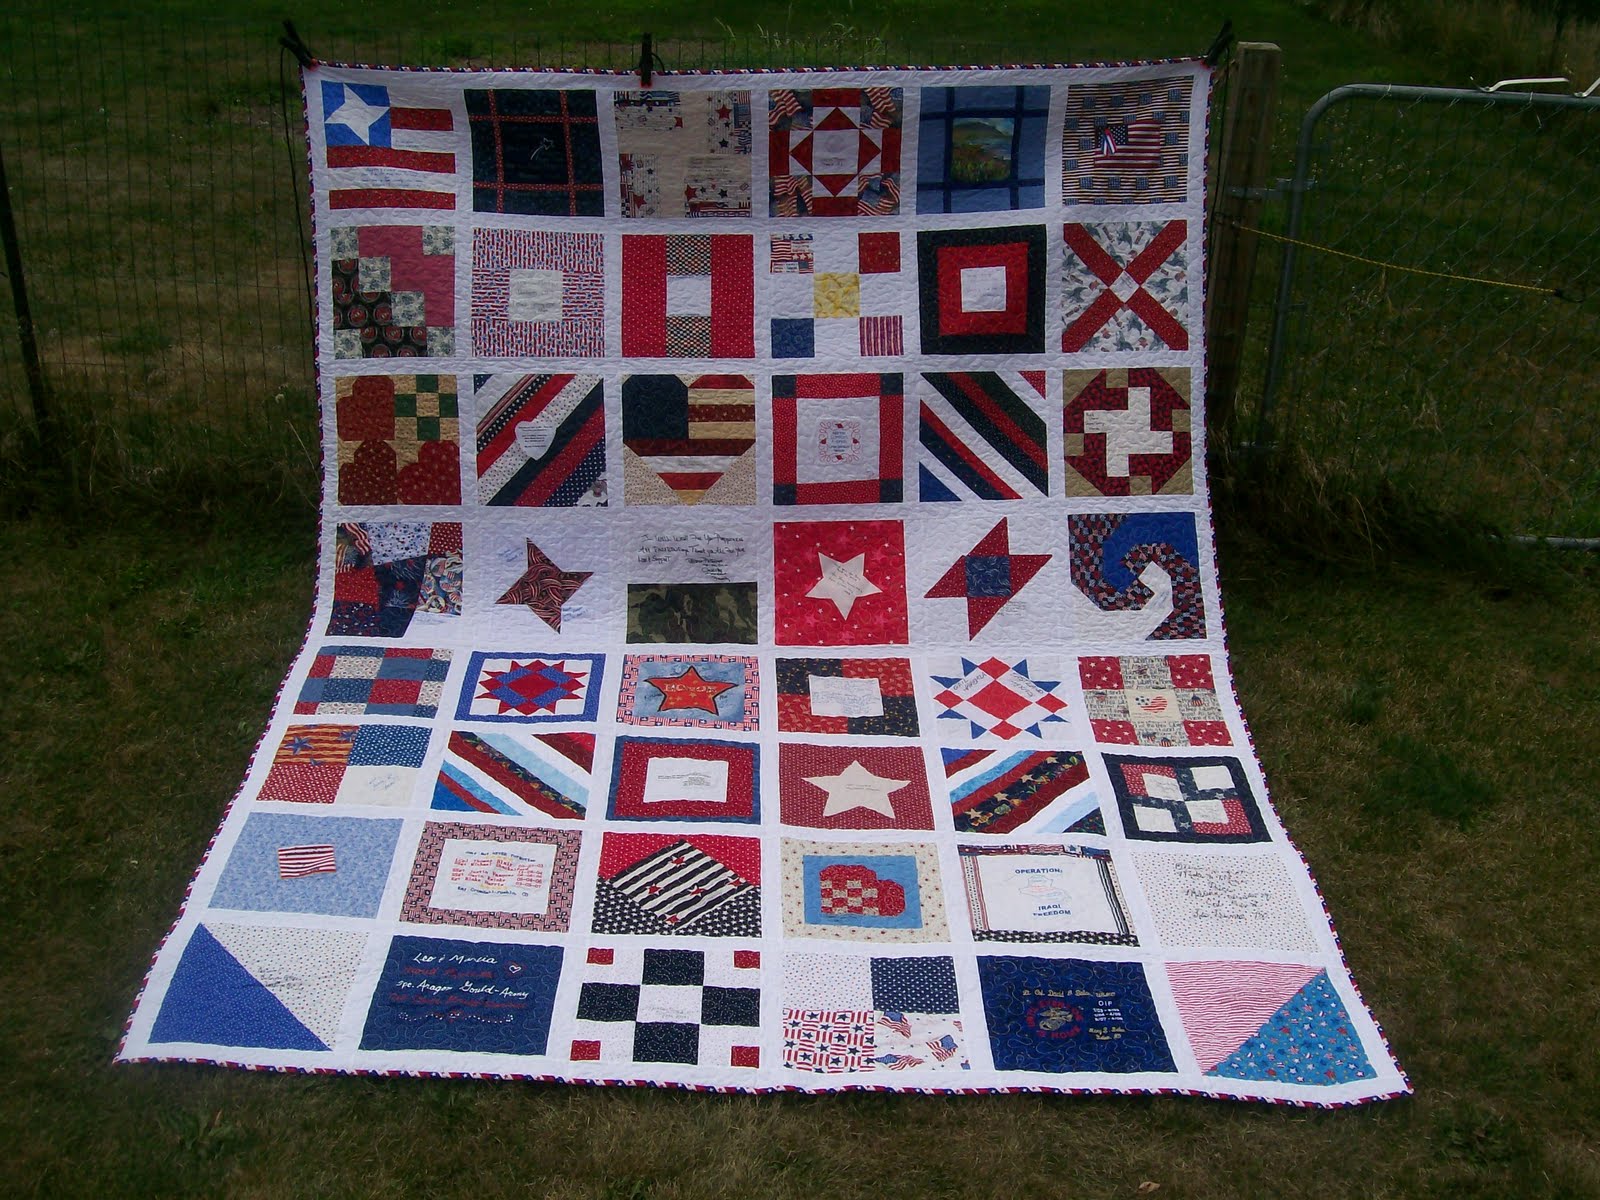
45 women, all contributors is some way to Marine Comfort Quilts, made squares for this quilt.  We each chose a square to make, then made one for ourselves and one for each of the other women.  All the blocks were mailed to one person who sorted the blocks and then mailed packages back to everyone.  I needed a few more blocks for the layout I chose, so I made three string blocks. 

I guess it should really say 45 Kindreds Spirits = 45 quilts.... with a bit of each of us wrapped up in each quilt.

Friday, July 16, 2010

Brag Alert

Excuse me while I toot my own horn for a minute or two.


Class: Quilt, machine quilted
Map Quilt won first place!!!
Stars and Nine Patch - second place

Class: Quilt, child's size, machine quilted
Birdie Quilt - second place
Splashes of Red - third place

Class: Quilt, miniature, hand quilted
Tea Party Scraps - second place

Class: Wallhanging, quilted
Rectangle Challenge - second place

Wow!  That was fun!

Now excuse me while I attempt to fit my head through the doorway so I can get back to my sewing room.

Thursday, July 15, 2010

Bound For The Fair

All these quilts are now sitting at the fairgrounds. Judges are looking at them now!  I hope they write lots of notes.  Ribbons are okay, but my favorite part is the judges' critiques.... I listen; I learn.

Yes, that's the map quilt at the bottom there.  I fixed a couple mistakes.  Junkyard Joe's house was in the wrong corner.  One road deadended where it really didn't.  And I completely missed one house.   All better now.  Then I added cars (little buttons from Karen and Sarah - THANKS GUYS!)  And one of the cars is on a gravel road so I added some fuzzy white yarn for dust.  Fun and done.

Thursday, May 13, 2010

Project Quilting fabrics


After several false starts I finally settled on a plan.  Here's my fifty rectangles to start my project. 

Wednesday, May 12, 2010

One Flower Wednesday

Well I made it on time this week. One block finished.  This time in 30s prints.  The plan was to make this one with templates and whip stitching.  I really tried but I just can't do it.  It's awkward and my stitches show.  So just plain hand stitching it is.

Tuesday, May 11, 2010

Thursday, May 6, 2010

One Flower Wednesdays

A hand sewn project has been calling me.  Grandmother's Flower Garden seems like the perfect quilt to sew by hand.  A bit ambitious maybe for my first hand sewn project but it IS just a piece at a time. So, I can do it. Yesterday, thanks to Quilting Fiesta, I found Karen of the blog Journey of a Quilter.  She is hosting a Garden Party.  Every Wednesday one flower needs to be sewn.  My first thought was I'll do a dozen each Wednesday.  You'll notice it's Thursday as I post this.  My first flower didn't get finished until this morning.  But it did get done!

TAH DAH!


and the back... I need to work on smaller, more consistent, straighter stitches... time and practice...

It's not really that color. See how my cutting board isn't even green?  It's really the color of the fabric below, which I purchased to make a wallhanging and had lots left. 


And, since I'm hand sewing a traditional quilt pattern it seemed appropriate to use 30's fabrics.  So maybe two quilts will come of this.  Just a few fat quarters to start. 
I feel out of my element with 30's fabrics but I was told after I use them for a while I'll wonder how I'd ever do without.  We'll see.  They are pretty cheery.

So now on Wednesdays you'll find me with my cup of tea at a Garden Party!

Tuesday, May 4, 2010

Chatelaine Anyone?

Recently I was asked to make a chatelaine and a pattern for one.  It took four tries to get the one I wanted for the pattern.  The final one had little log cabin blocks on the pockets and summer fruit, flowers, birds and bees and a few other things... kinda cute but no decent pics :(  I handed that one over along with the pattern.  But now there are three chatelaines left and I know I won't use them.  They are supposed to be handy at retreats...  to keep your applique scissors, your frogging tool, and other essentials right where you need them.  Anybody need / want one?